✦ Learn palmistry for beginners
Learn Palmistry — A Beginner's Course In Seven Steps
अद्यतन 17 Oct 20266 मिनट पढ़ेंहस्तरेखा AI मुफ़्त और नियम-आधारित हस्तरेखा गाइड प्रकाशित करता है — हर पेज पहले शास्त्रीय अर्थ बताता है, फिर आपकी रोज़मर्रा की ज़िंदगी के लिए उसका मतलब।
छोटे में
Learn palmistry the way it is actually taught: one layer at a time. First the hand's landscape — mounts, fingers, which hand is active. Then the major lines, one by one. Then signs, and finally the skill that separates readers from reciters: comparing two hands and telling a single coherent story.
This page is the free course outline that used to cost a coaching fee: the exact seven-step order, the five beginner mistakes that ruin readings, a ten-minute daily practice, and pointers into the deeper guides on this site for every step.
One promise from the start: this course teaches you to read patterns and describe tendencies honestly. It will not teach you to predict dates, lottery numbers or the gender of unborn children — no honest palmistry course does.
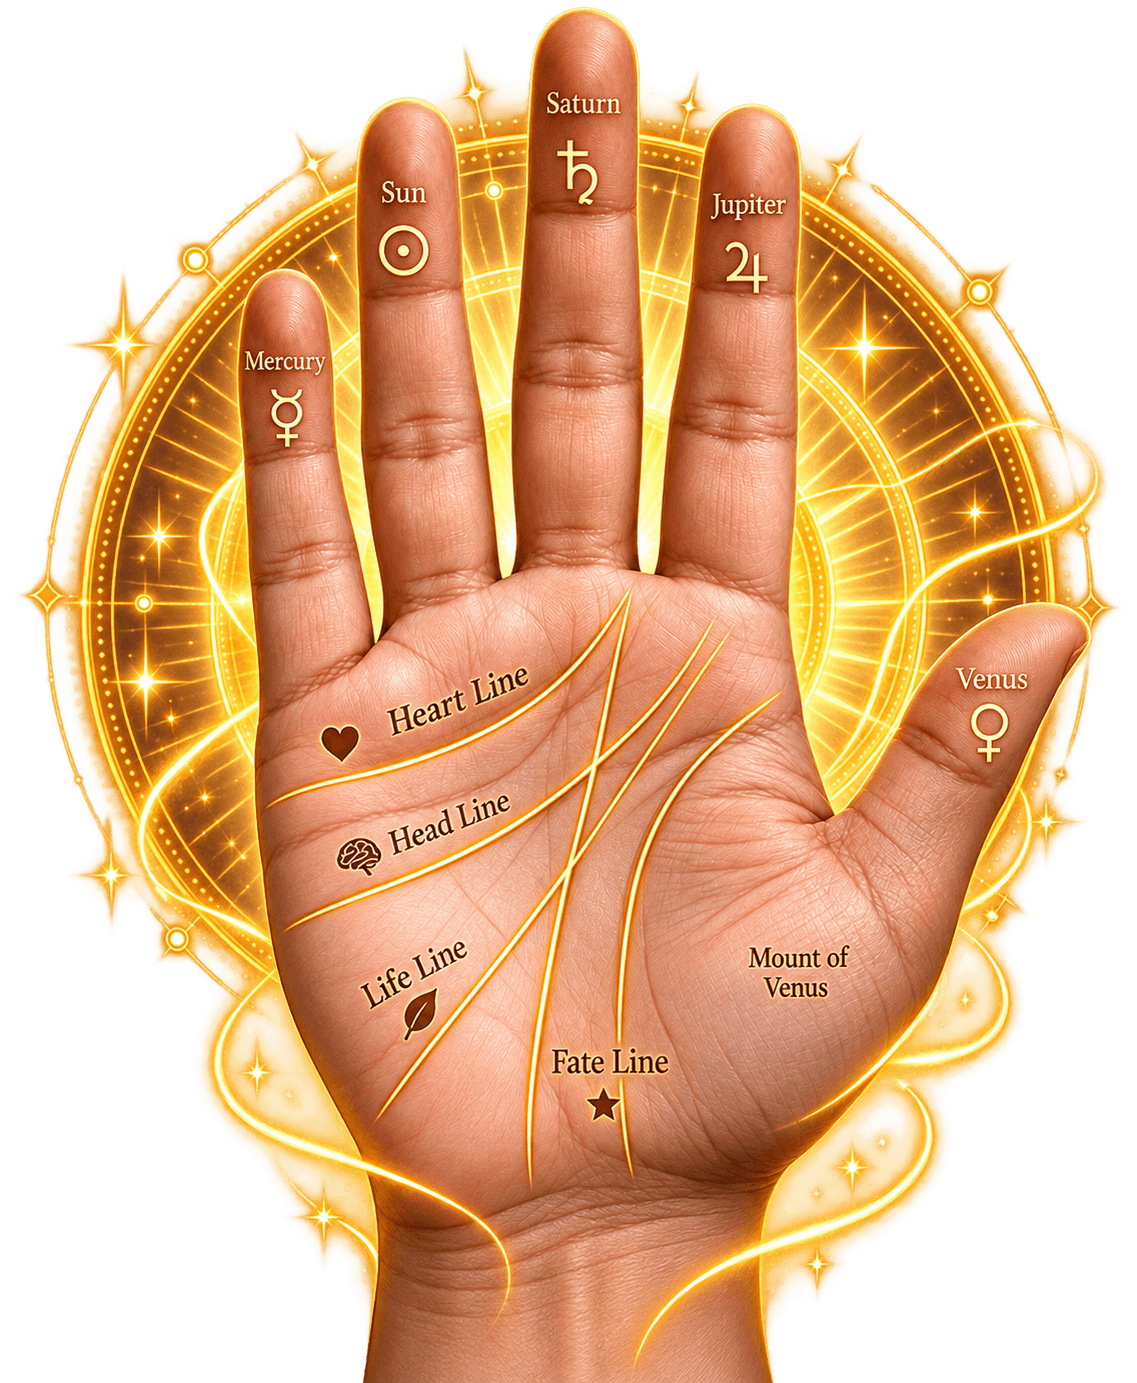
The learning map: nine lines, seven mounts, two hands. The numbered list under the diagram links every guide, so you can study one feature at a time.
शुरुआत: हस्तरेखा सीखने का सही क्रम
Beginners usually start with the life line and then jump randomly — which is why most of them stop feeling lost. The traditional order is deliberate: landscape first, then lines, then signs, then synthesis. Landscape means the mounts and the two hands; you cannot understand why a line matters until you know what ground it sits on.
Spend your first week only on landscape and hands. It feels slow and then saves months: every later lesson becomes a variation of 'this line on this mount, stronger on this hand'.
Step 1–3: हथेली, उंगलियाँ और पर्वत पहचानें
Start by classifying, not by judging. Palm shape (square or long), finger lengths, and the textures of the skin are the first vocabulary of a reader. Then learn the seven mounts and their subjects — that single chart upgrades every line you will ever read.
Step 1 — The hands
Fix the active-passive rule first: one shows the present, one shows the start.
Step 2 — Palm shape
Square palms read practical, long palms read idea-first — a quick temperament scan.
Step 3 — The seven mounts
Jupiter, Saturn, Apollo, Mercury, Venus, Moon, Mars — the addresses of the hand.
Step 4–5: मुख्य रेखाएँ एक-एक करके
Take the big four first — life, head, heart, fate — and let each live alone for a week. Learn one line's starting points, its normal course and its three classic variations before touching the next. Depth, direction and breaks are the only three questions you ask in this phase.
Then the working lines: money, marriage, sun, health, children. For each one this site already has a dedicated guide with diagrams — use the numbered list under the palm diagram above as your syllabus, and keep one notebook page per line with your own hand drawn in it.
Step 6–7: चिह्न और दोनों हाथों की तुलना
Signs come late because they are punctuation: stars, triangles, islands, crosses. Learn them only inside a line you already know, otherwise every mark will look special. Then the graduation step — holding both hands and describing the difference as one story about the person.
That last step is the whole skill. A reader who can say 'the born pattern was soft, the working hand built discipline' has read the person; one who recites nine lines from the active palm has read only half a hand.
नई शुरुआत में आम 5 गलतियाँ
Every self-taught beginner steps on the same five stones. Knowing them in advance is most of the course.
Jumping to judgment
One bad-looking line is not a verdict; read three features before concluding anything.
Ignoring the passive hand
Half the message lives there — a lesson readers learn late and beginners never guess.
Reading in bad light
Room light hides half the fine lines; a phone photo in daylight shows them all.
Collecting books, not hours
Ten photos a week taught more hands than ten books a month. Practise more than you read.
Predicting to impress
Guarantees collapse trust. Describe patterns, name tendencies, hand the decisions back.
अभ्यास का तरीका: रोज़ के दस मिनट
The ten-minute drill: one palm photo a day, one feature a day. Monday the life line on your own hand, Tuesday the head line on a friend's photo, and so on until all nine lines are done — then loop. Write two sentences per photo: what you see, and what you honestly cannot yet tell.
For structure, pair the drill with the free guides: start at the complete palmistry guide, then go line by line, and use the AI reading as a sparring partner — upload a palm, compare its twelve-area report with your own notes, and study where the two disagree. That disagreement is your syllabus.
अक्सर पूछे जाने वाले सवाल
छोटे और सीधे जवाब — यही सवाल पाठक रोज़ पूछते हैं।
How long does it take to learn palmistry?
Basic fluency — reading the four major lines and both hands without props — usually takes three to six months of ten-minute daily practice. Deeper work like signs and synthesis keeps growing for years, as with any traditional craft. The pace depends on photos read, not books collected.
Which line should a beginner learn first?
Start with the landscape — the two hands, palm shape and the seven mounts. Then take the four major lines one per week: life, head, heart, fate. Each line gets studied for its starting point, depth, direction and breaks before the next one. Random jumping is why most beginners feel lost.
Can I learn palmistry for free?
Yes. This site's guides — the complete palmistry guide plus one page per line — cover everything in the beginner-to-intermediate syllabus, and they are free. Add a daily photo practice and the free AI reading for cross-checking, and you have a complete self-study kit without paying a coaching fee.
Which books are best for learning palmistry?
The English classics are reliable starting points: Cheiro's language-of-the-hand work and William Benham's Laws of Scientific Hand Reading. In Hindi, the traditional hast-samudrik shastra books carry the Indian reading of mounts and signs. Read one book slowly, and practise more than you read.
How do I practise palmistry without real people around?
Photographs and the AI reading. Collect palm photos from family and friends, and use public figures' open photographs. Upload a palm to the AI reading, write your own two-sentence reading first, then compare with the twelve-area report and note the disagreements — that gap between your note and the report is your daily lesson.
अपनी हथेली पढ़वानी है?
अपनी हथेली की फ़ोटो अपलोड करें और AI से मुफ़्त रीडिंग पाएँ — राशि, नक्षत्र और हाथ की हर प्रमुख रेखा, हिंदी और English में।
आगे पढ़ें
इसी विषय की चुनी हुई गाइड।
हस्तरेखा एक पारंपरिक विश्वास और मनोरंजन आधारित मार्गदर्शन है — इसे चिकित्सा, कानूनी या वित्तीय सलाह की जगह न लें।
Life line · Head line · Heart line · Fate line · Sun line · Money line · Marriage line · Health line · Children line